
Unity ml-agent tool kit is a wonderful tool for both beginners of machine learning and Unity. I have learning machine learning and deep learning with different data sets I found on online, however I never thought it would be this easy to train a neural network to play a game. With Unity ml-agent tool kit, I managed to make my first ml-agents game within couple of hours. ( it is not actually a game though )
This is how i did it.
Step 1 - Requirements and installation (Skip this step if you have already setup everything for ml-agent)
Note :- This is just a summary of what you have to do. my ml-agents documentation has must more detail version of this. Best i can do is to provide a summary and some points that you may easily miss when following the guide provided in ml-agents.
Follow the links below to get started.
1. Get the Github project and install necessary tools and applications
2. Basic Guide to test and train examples given in ml-agents toolkit
Summary and useful tips.
I used TensorFlow for quite a while, so I had python and tensor-flow installed in my pc. If you don't have python or TensorFlow installed, best option is to install Anaconda. Just go to this link and follow this simple steps. Installing Tensorflow with anaconda
Once you have TensorFlow installed, next step is to install Unity 3D. Just go to Unity3 official site and you can download unity3d for free. When installing dont forget to select Linux build support as well.
Now you can clone the following git hub project and get started.
https://github.com/Unity-Technologies/ml-agents
Here are the some important things to know about the ml-agents project you just cloned.
- "configs" folder contains the "trainer_config" file, which defines the configs for each ml-agent brain. There is a default configuration available. You can make adjustments as you will. Also you can specify custom configuration any ml-agent brain. ( I will get to this later, you have to set your own configurations for this ml-agent game )
- "models" folder contains the trained models, Once you are done will tanning, a .bytes file will be created with a user specified name. You can use that model to run your ml-agent game.
- "UnitySDK" - This is the folder that has the Unity project. You have to open this project using unity. There, you are provided with some examples that you can try out.
- ml-agents - This is the location for ml-agents api. just visit this location from your command prompt and run the command "pip install ." Don't forget the "." in the command.
Don't forget to download this Tensorflow plugin for Unity.
Step 2 - Setting up the learning environment
I am not going to provide details of setting up the Unity environment. This is recourse ml-agents has a excellent guide for setting up the environment. Just follow this guide. ( This guide shows you how to make a ball roll and go through cubes randomly on a certain plane )
However this guide does not provide clear guide on what to do next. If you train the example with the default parameters you will end-up with poorly working ml-agent, ball allways fail to find the block no matter how-many times i trained. So, in next step we will see what configs we need to set to properly train the environment.
Step 3 - Properly train the environment.
Roller Accademy settings

Not much changed from default settings, just keep the time scale at a average value.
Brain
- Keep the stacked vectors at a average value. ( This specify how many previous observations are considered when taking decisions.

Roller agent
- Speed = 10 and Decision frequency 5 ( Per 5 frames inputs are provided )
- I also updated the script file. ( I just gave more rewards for positive acts ) Just download it from here

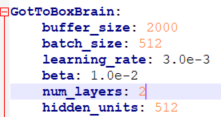
GotToBoxBrain:
- buffer_size: 2000
- batch_size: 512
- learning_rate: 3.0e-3
- beta: 1.0e-2
- num_layers: 2
- hidden_units: 512
mlagents-learn config/trainer_config.yaml --run-id=rollerAgent --train
Once training is finished you can find the trained model in the models folder in ml-agent git project. You can use the model file ( ".bytes" file ) in your unity project's Graph model. Enjoy the results.

Where are the source code?
ReplyDelete